Connect Multiple AWS Accounts
Overview
Use Multi-Account AWS onboarding when you need LightMesh to discover networking resources across many AWS accounts that share the same IAM trust pattern (principal ARN, role name, and external ID).
LightMesh still creates one cloud account (provider) per AWS account ID and syncs each account individually. Bulk import saves time by registering many account IDs at once after you deploy the IAM role in AWS.
Single account? Use the standard wizard in AWS Integration.
Permission required: Adding or removing cloud accounts requires an app role of Owner, Administrator, or Contributor. See Roles & RBAC for details.
Prerequisites
- AWS Organizations or a list of member account IDs (12 digits each)
- IAM role deployed in each target account (or org-wide via CloudFormation StackSets)
- SaaS: no extra AWS principal setup in LightMesh
- Self-hosted: AWS ARN Configuration (or server STS environment variables) completed before bulk import — see Self-hosted and STS
- Default IAM role name
Lightmesh-Access-Providerunless you chose a custom name in CloudFormation
How it works
| Concept | Behavior |
|---|---|
| Shared settings | Org AWS ARN configuration (principal ARN, optional access keys, region) |
| Per account | One LightMesh cloud account row per AWS account ID |
| Trust | IAM role in each member account trusts your principal with external ID LM{organizationId} |
| Sync | After bulk create, LightMesh starts synchronization for each new account automatically |
| Batch limit | Up to 100 account IDs per bulk import |
Step 1: Open bulk import in LightMesh
- Navigate to Cloud → Cloud Accounts.
- Click Add Cloud Account (or + Add Cloud Account).
- Choose AWS.
- On Choose how you want to connect AWS accounts, select Multiple accounts.
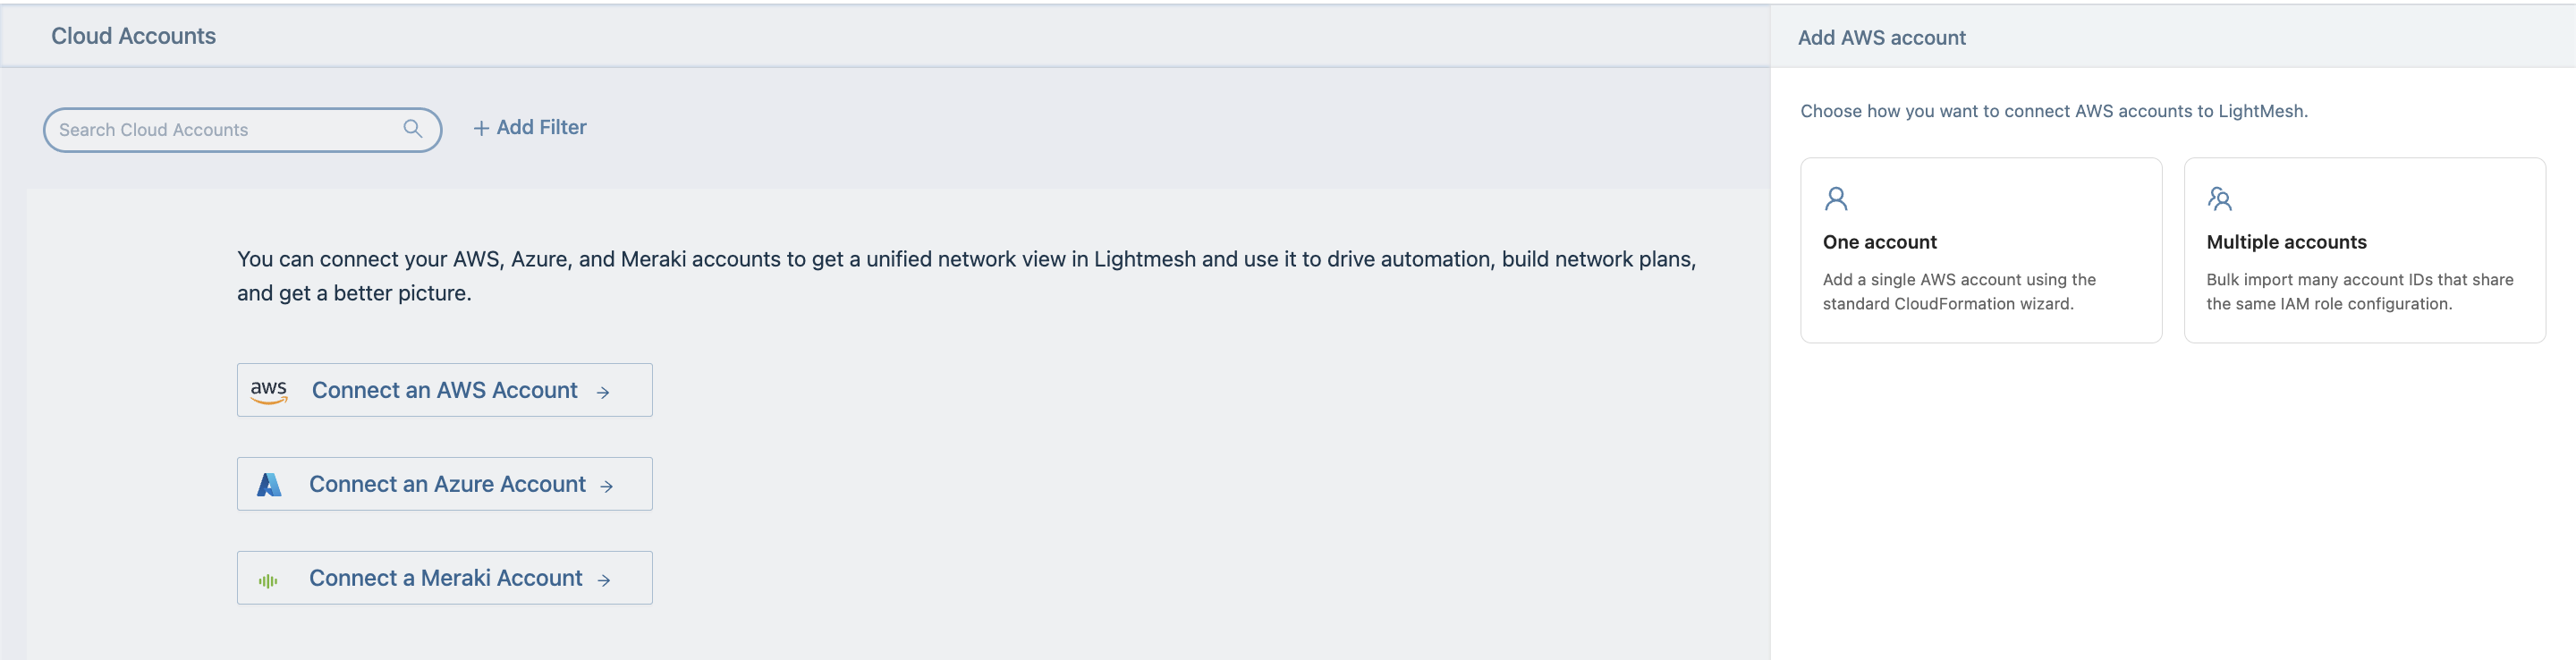
To return to the single-account wizard, use ← Back to account options and choose One account.
Step 2: Configure — IAM role and template
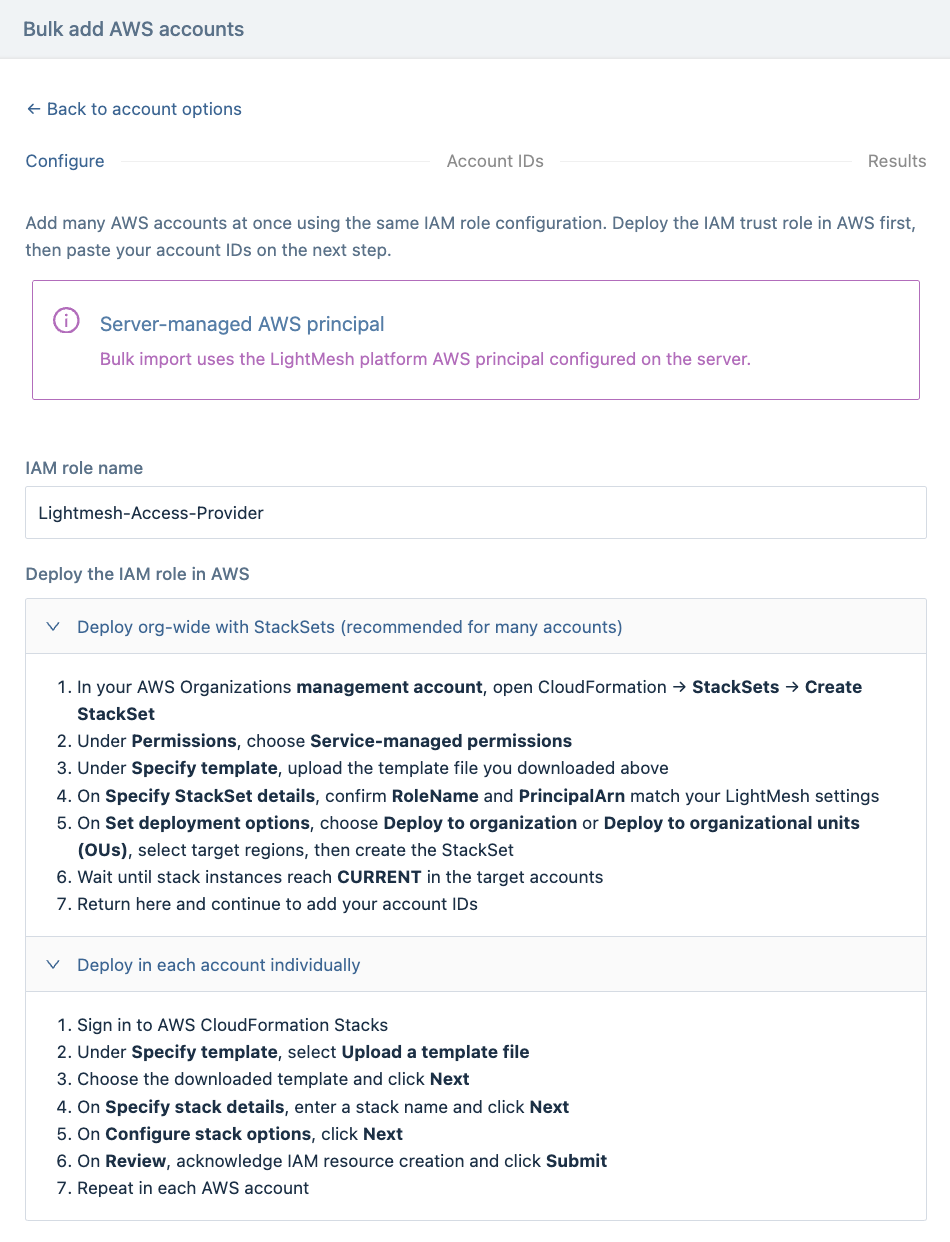
The Configure step sets the IAM role name, provides the CloudFormation template, and shows how to deploy the IAM role in AWS — the same overall flow as single-account AWS (template first, deploy in AWS, then continue in LightMesh).
IAM role name
Confirm IAM role name matches the role you will create in AWS (default: Lightmesh-Access-Provider).
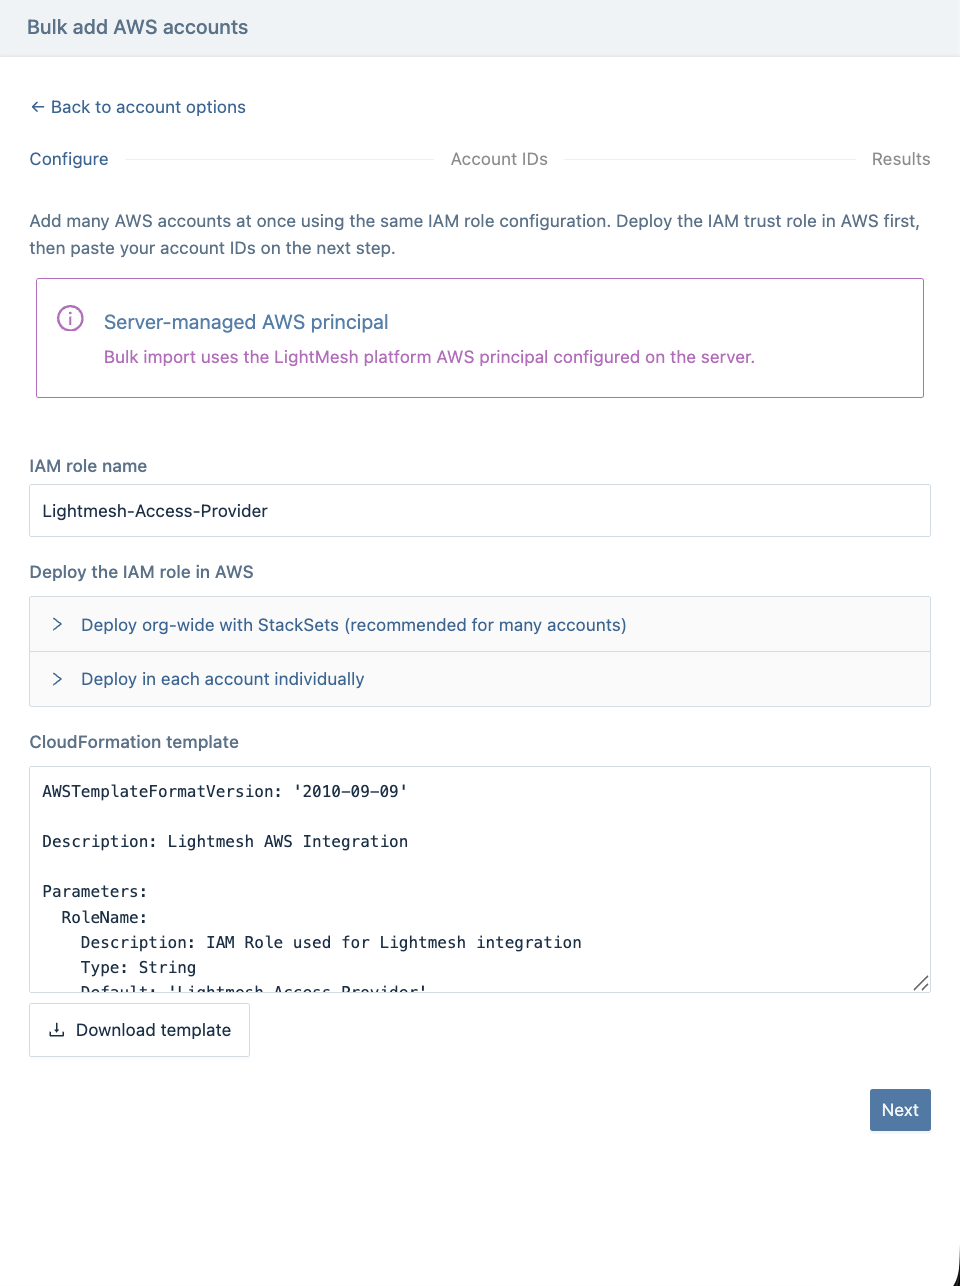
Download the CloudFormation template
- Review the template text in the drawer (role name, principal ARN, external ID).
- Click Download template (
lightmesh-access.yml). - Use that file for StackSets or per-account stacks.
Deploy the IAM role in AWS
Expand one of the in-app guides (same steps as below), or follow:
Option A — CloudFormation StackSets (recommended for many accounts)
- In your AWS Organizations management account, open CloudFormation → StackSets → Create StackSet.
- Under Permissions, choose Service-managed permissions.
- Under Specify template, upload the template file you download from LightMesh (next section).
- On Specify StackSet details, confirm RoleName and PrincipalArn match your LightMesh settings.
- On Set deployment options, choose Deploy to organization or Deploy to organizational units (OUs), select target regions, then create the StackSet.
- Wait until stack instances reach CURRENT in the target accounts.
- Return to LightMesh and continue to account IDs.
Option B — Deploy in each account individually
- Sign in to AWS CloudFormation Stacks in each member account (use AWS GovCloud console for GovCloud).
- Under Specify template, select Upload a template file.
- Choose the downloaded template and click Next.
- On Specify stack details, enter a stack name and click Next.
- On Configure stack options, click Next.
- On Review, acknowledge IAM resource creation and click Submit.
- Repeat in each AWS account.
Click Next when stack deployment is underway or complete in the target accounts.
Step 3: Account IDs — paste or upload
- Paste AWS account IDs (one per line), or separate IDs with commas, semicolons, or tabs.
- Optionally click Upload CSV (
.csvor.txt). A header row containing “account” is ignored; the first 12-digit value on each row is used. - Review the preview table:
- Ready — will be created
- Skipped rows show a reason (see Skipped account IDs)
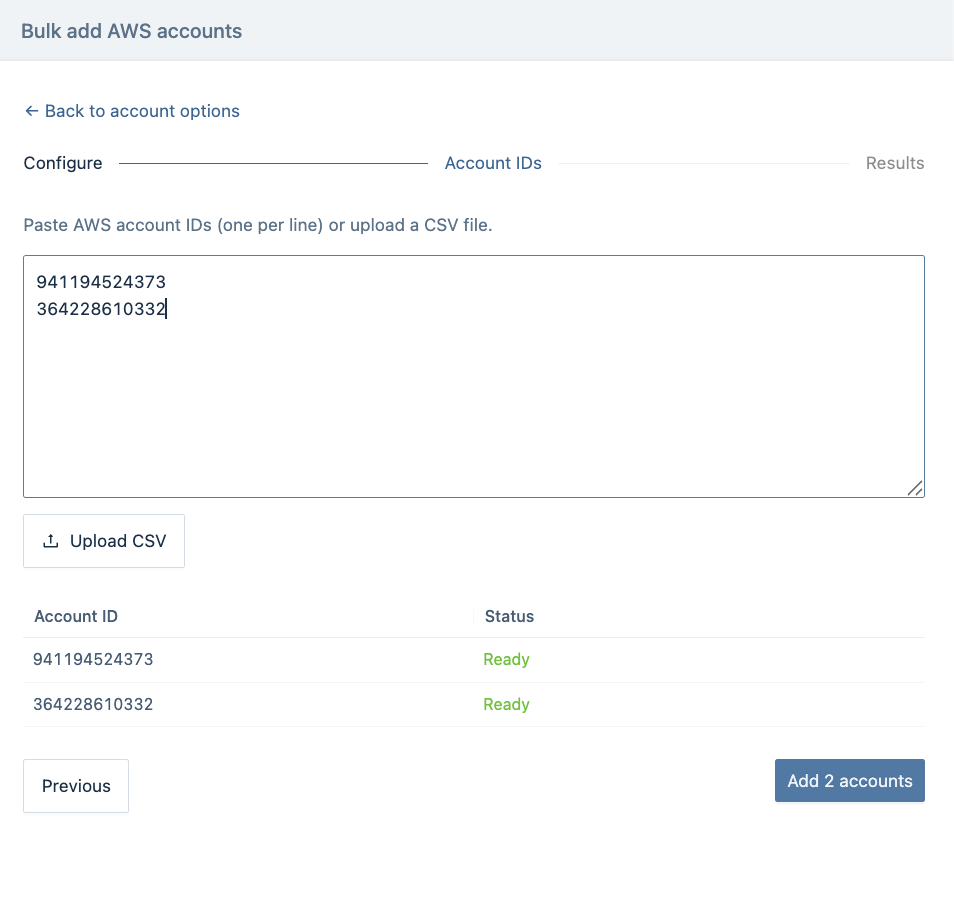
- Click Add N account(s) (only valid, non-duplicate IDs are submitted).
Step 4: Results and sync
After submission, the Results step summarizes created and skipped accounts.
- New accounts appear on Cloud Accounts with sync status Synchronizing.
- Use the refresh control on the list to monitor progress (same as single-account AWS).
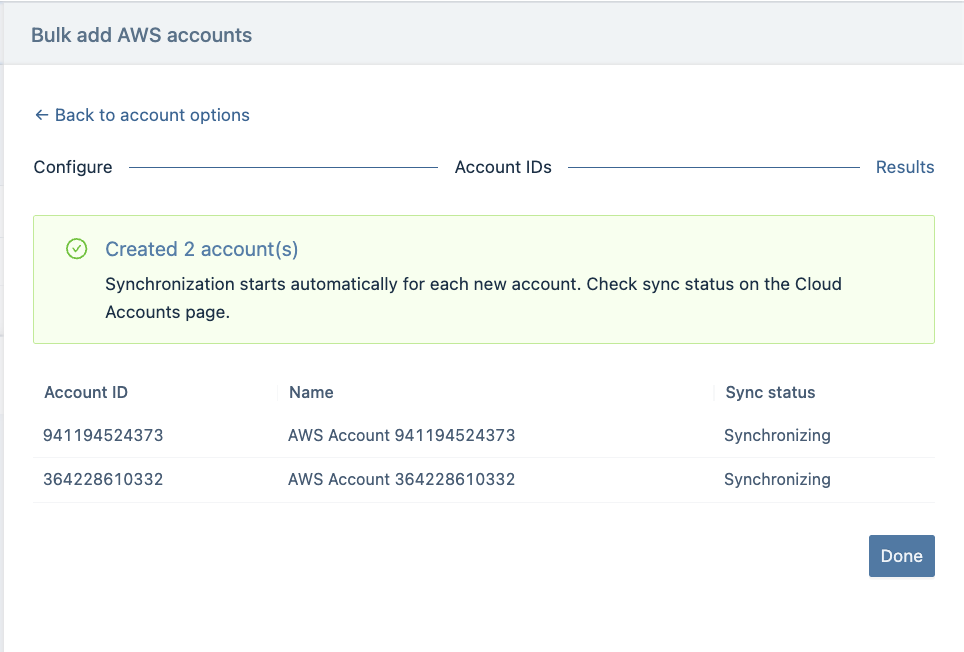
Click Done to close the wizard.

Skipped account IDs
Bulk import never fails the whole batch because of validation issues; invalid rows are skipped and reported.
| Reason in UI | Meaning |
|---|---|
| Invalid format (must be 12 digits) | ID is not exactly 12 digits |
| Reserved platform account | LightMesh platform account (not connectable) |
| Duplicate in list | Same ID appeared twice in your paste/upload |
| Already connected | Account ID already exists for your organization |
Fix skipped IDs and run another bulk import, or add a single account via AWS Integration if needed.
Self-hosted and STS
On Configure, self-hosted tenants may need to pick an AWS ARN configuration entry in the drawer. If Next stays disabled, finish AWS ARN Configuration first (or ask your admin to set server STS variables). A legacy org may show a single saved configuration without a dropdown; SaaS tenants use the platform principal and do not configure this in Settings.
| Deployment | Bulk create providers | Sync member accounts |
|---|---|---|
| SaaS | Supported | Supported via platform STS assume-role |
| Self-hosted (principal ARN + keys configured) | Supported | Supported via assume-role into each account |
| Self-hosted (static keys only, no principal ARN) | May create rows | Warning: sync uses org keys directly; configure Principal ARN to assume the role in each target account |
Troubleshooting
| Symptom | What to check |
|---|---|
| Configure Next disabled | Self-hosted: complete AWS ARN Configuration or server STS; see Self-hosted and STS |
| All accounts stuck synchronizing | IAM role not deployed or wrong role name in member account |
| Access denied on sync | Principal ARN, external ID LM{orgId}, or trust policy on member role |
| Account skipped as “Already connected” | Remove duplicate from list or manage existing row on Cloud Accounts |
| StackSet not reaching CURRENT | OU deployment scope, region selection, or management account permissions |