Meraki Integration
Overview
The LightMesh Meraki integration connects a Cisco Meraki organization through the Dashboard API and imports LAN inventory into LightMesh. Sync creates MX/appliance VLAN and single-LAN networks as subnets, then links devices and clients whose IP addresses fall inside those subnet CIDRs on the IP grid (source: meraki).
This is a read-only discovery path into LightMesh IPAM — LightMesh does not push configuration back to Meraki.
Prerequisites
- Cisco Meraki organization with Dashboard API access enabled
- Meraki Dashboard API key
- LightMesh account with Cloud Integration permissions (Owner, Administrator, or Contributor)
- Meraki available under Add Cloud Account in your LightMesh environment
Permission required: Adding or removing cloud accounts requires an app role of Owner, Administrator, or Contributor. Readers cannot manage cloud integrations. See Roles & RBAC for details.
Supported Meraki Resources
| Resource Type | Discovery | Management |
|---|---|---|
| MX / appliance VLANs | ✓ | Read-only (imported as LightMesh subnets) |
| Single-LAN appliance networks | ✓ | Read-only (imported as LightMesh subnets) |
| Devices with a LAN IP inside a synced CIDR | ✓ | Read-only (Resource → Interface → IP assignment) |
| Clients with an IP inside a synced CIDR | ✓ | Read-only (IP assignments / discovery history) |
| Devices or clients without a matching subnet CIDR | Skipped | — |
Configuration
1. Generate a Meraki API key
- Sign in to the Meraki Dashboard.
- Navigate to Organization → Configure → API & Webhooks → API keys and access.
- Generate an API key and store it securely. LightMesh needs this key once at connect time (and again only if you rotate credentials).
Meraki API keys inherit the permissions of the Dashboard user who creates them. Use an account that can read organization networks, appliances, devices, and clients for the org you plan to sync.
2. Add Meraki in LightMesh
Step 1: Open Cloud Accounts
- Navigate to Cloud → Cloud Accounts.
- Click Add Cloud Account → Meraki (or Connect a Meraki Account from the empty state).
Step 2: Enter connection details
- Enter a Name for the integration (for example,
Meraki HQ). - Paste the Meraki API key.
- Click Load orgs to preview organizations available to that key.
- Select the Meraki Organization to sync.
- Click Finish Adding Account to save and begin synchronization.
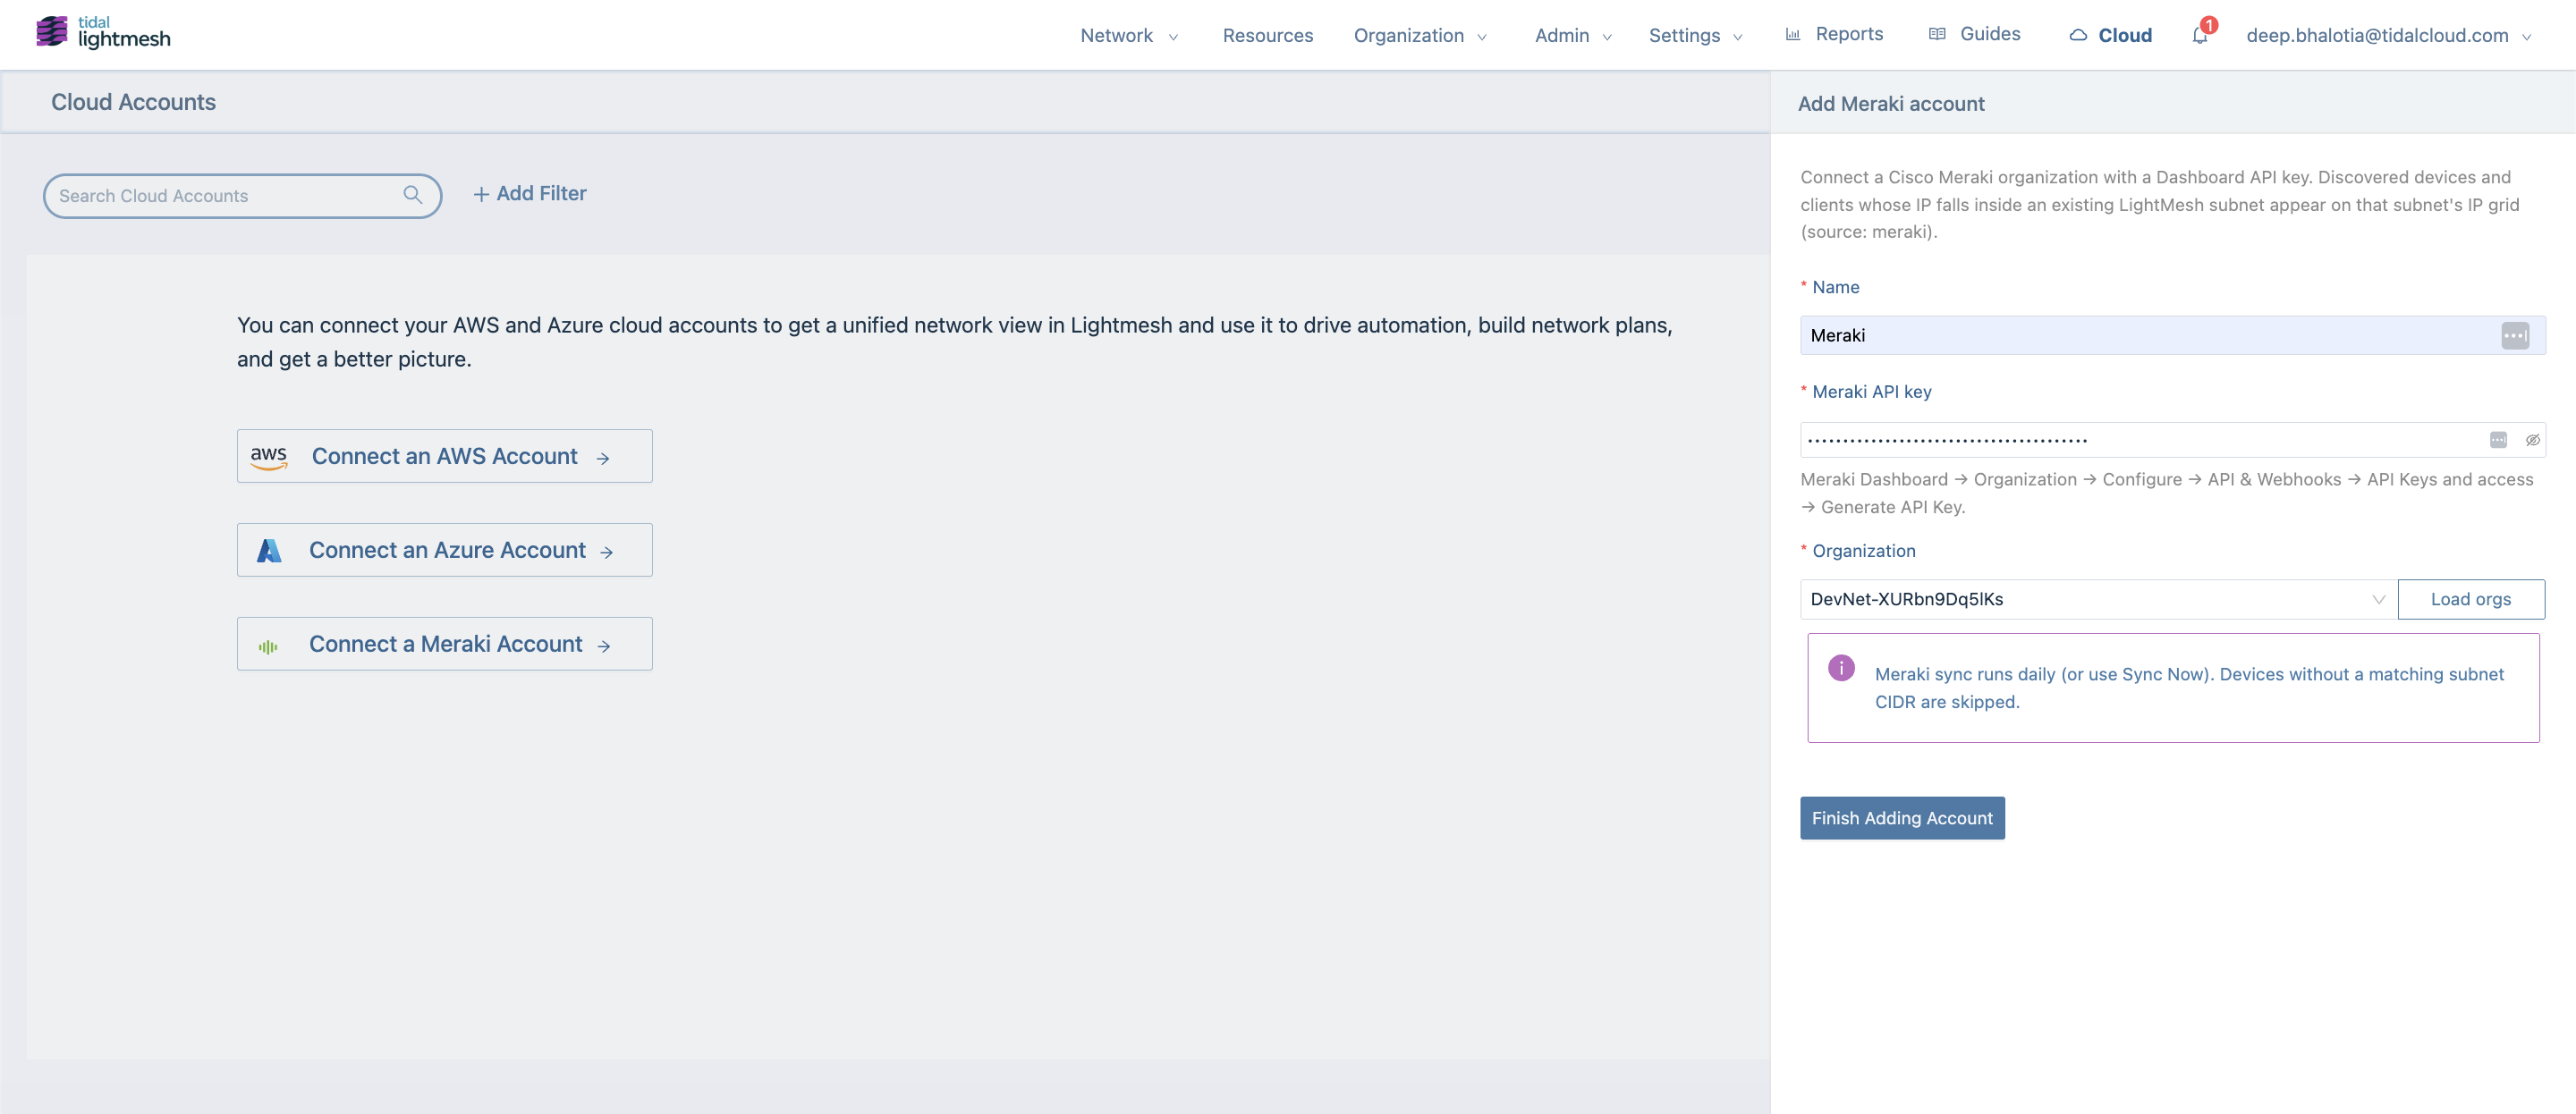
Tip: If only one organization is returned, LightMesh selects it automatically after Load orgs.
Step 3: Confirm the connected account
After the first sync completes, the Meraki account appears in Cloud Accounts with sync status, last synced time, and Meraki sync counts (subnets, resources, IP assignments, and scan rows).

3. Edit an existing Meraki account
- Open the Meraki account from Cloud → Cloud Accounts.
- Update the Name, optionally replace the Meraki API key, and reload organizations if the key changed.
- Leave the API key blank to keep the existing key. LightMesh does not show the stored key after save.
Synchronization
Default Behavior
- Scheduled sync: Daily (06:00 UTC)
- Manual sync: Click Sync Now on the Meraki account (also available from the subnet header where Meraki sync is exposed)
Note: You can manually trigger synchronization at any time without waiting for the daily job.
Sync Process
- LightMesh authenticates to the Meraki Dashboard API with the stored API key.
- It loads networks for the selected organization and collects MX/appliance VLAN and single-LAN subnet definitions.
- Matching subnets are created or updated in LightMesh.
- Devices and clients with LAN/client IPs inside a known Meraki subnet CIDR are linked as resources and IP assignments.
- Discovery history is recorded with
sourceType: meraki. - Status and counts update on the Cloud Account record.
What gets skipped
- Devices or clients without a LAN/client IP
- Devices or clients whose IP does not fall inside any synced Meraki subnet CIDR
- Non-appliance networks that do not expose VLAN or single-LAN subnet data through the Meraki API
If sync completes with 0 subnets and 0 resources, LightMesh shows a No Meraki data imported notice. Confirm the organization has MX/appliance networks with VLAN or single-LAN addressing and that the API key can read that org.
Sync errors and retries
- Failed syncs surface a Synchronization failed message with the error detail on the account drawer.
- If a sync remains stuck in Synchronizing for more than about 30 minutes (process crash, deploy, or hung Meraki API), LightMesh marks the account as Error. Click Sync Now to retry.
Security Considerations
- LightMesh uses the Meraki Dashboard API for read-only discovery into IPAM; it does not change Meraki configuration.
- After connect, LightMesh does not display the API key again; supply a new key only when rotating credentials.
- Rotate or revoke the key in the Meraki Dashboard at any time to cut LightMesh access, then update the LightMesh account with a new key if needed.
Limitations
- Meraki is treated as a discovery source for LAN/VLAN subnets and in-CIDR IPs — not a full Meraki CMDB or wireless inventory browser.
- Useful Meraki metadata (network name, model, product type, serial, tags) is retained on discovered records where available; LightMesh still organizes primarily around subnets and IP assignments.
- Availability of the Meraki option under Add Cloud Account depends on your LightMesh environment rollout.
Conclusion
LightMesh’s Meraki integration gives you a continuous, read-only view of Meraki-managed LAN and VLAN addressing alongside the rest of your IPAM. Daily sync (plus Sync Now) keeps MX/appliance subnets and in-CIDR device/client IPs current without running nmap against those networks.
If you haven’t already, start a trial and connect Meraki from Cloud → Cloud Accounts.