Headless DHCP sync for Windows Server Core without the desktop agent UI
DHCP Discovery on Windows Server Core
Use this guide when the DHCP collector runs on Windows Server Core (or any headless Windows Server install) where there is no desktop shell, system tray, or in-app configuration UI.
For Windows 10/11 or Server with Desktop Experience, use DHCP Discovery (Windows Discovery Agent) instead.
The headless agent performs the same DHCP collection and LightMesh sync as the desktop build: PowerShell cmdlets → local SQLite cache → GraphQL sync. After the first successful sync, LightMesh shows DHCP servers, scopes, leases, and lease history the same way as in the desktop guide.
Desktop vs Server Core deliverable
| Deployment | Download | Install path |
|---|---|---|
| Desktop / Server with UI | Download MSI on Settings > Downloads | MSI installer or GUI app |
| Windows Server Core | Download ZIP on Settings > Downloads — do not use the MSI as the primary install | Extract exe + config.toml, edit config, register Windows Service via PowerShell |
Server Core build behavior:
- No dashboard, tray, or
--ui(headless binary exits with an error if--uiis passed). - GraphQL sync only — do not set
lightmesh.modeinconfig.toml(ignored if present). - Normal operation uses the Windows Service or explicit CLI flags (
--collect-once,--service-run).
Prerequisites
On the Windows Server Core host where you install the agent:
-
Operating system: 64-bit Windows Server Core 2016 or later, with the DHCP server role installed when collecting locally on that machine.
-
DHCP PowerShell module: The same Microsoft DHCP cmdlets as the desktop DHCP guide (
Get-DhcpServerv4Scope,Get-DhcpServerv4Lease, IPv6 counterparts, and so on). Verify in an elevated PowerShell session:Get-DhcpServerv4Scope | Select-Object ScopeId,Name,State -
Permissions: Local Administrator to install, uninstall, or control the Windows Service.
-
Network: Outbound HTTPS from the DHCP server to your LightMesh URL (hostname only, no
/graphqlpath). The server must resolve and reach that host andsource.server_fqdn(often the same machine). -
Disk: Write access for the SQLite database path and log files configured in
config.toml.
LightMesh URL examples
Set base_url under [lightmesh] in config.toml to the same hostname you use in the browser:
- SaaS:
https://next.lightmesh.com - Self-hosted:
https://mylightmesh.domain.com
Who can create API keys and download the agent
Sign in to LightMesh as a user with the Owner or Administrator application role to open Admin > API Keys and Settings > Downloads. On the Windows Discovery Agent card, use Download ZIP for Server Core (not Download MSI).
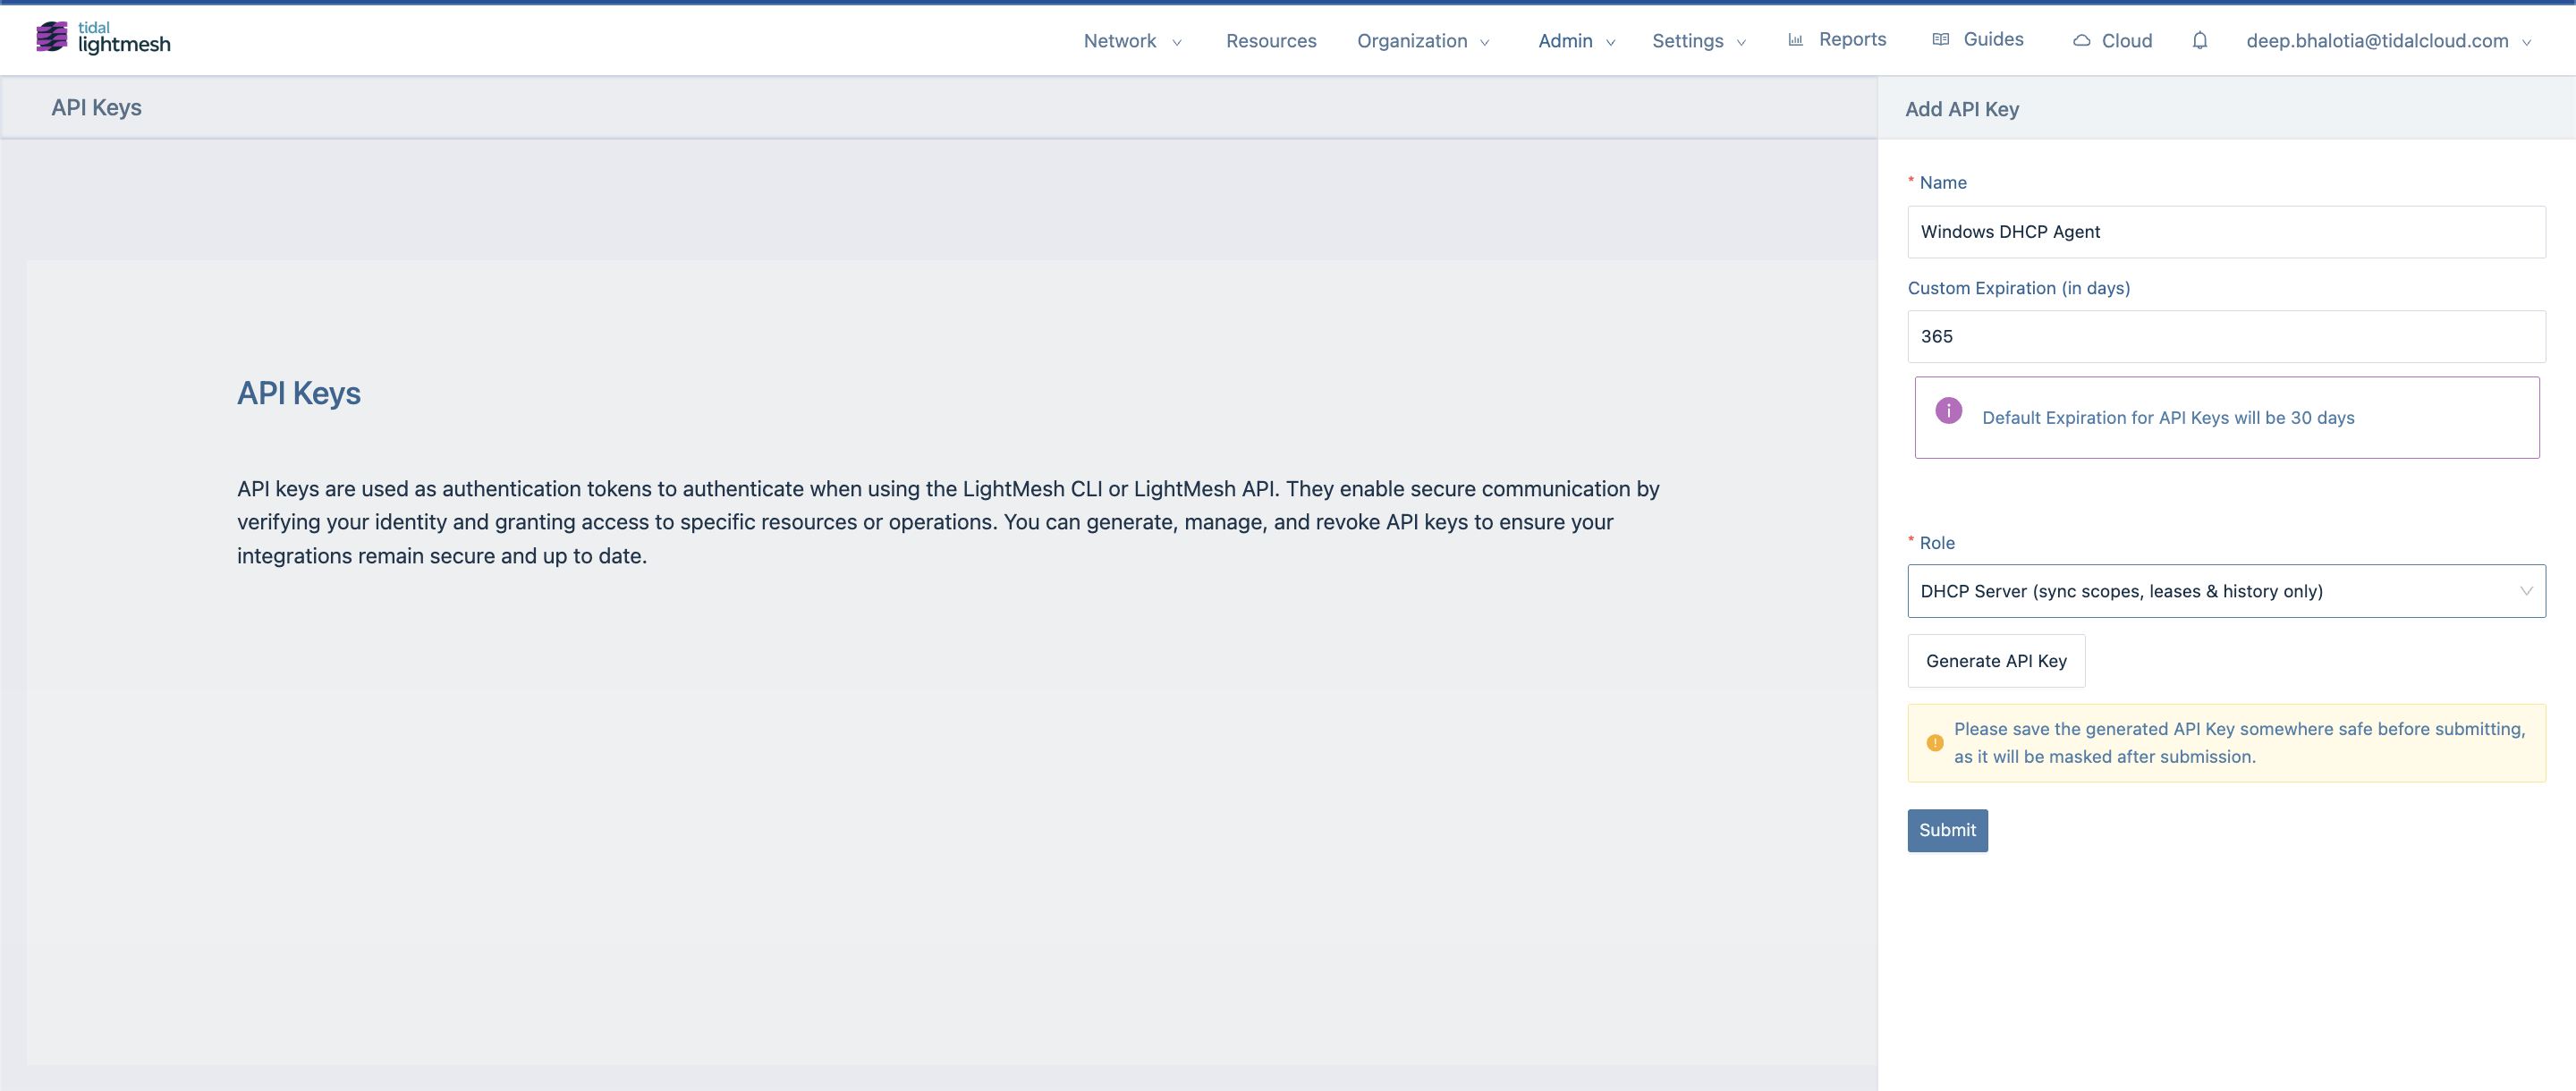
1. Create a DHCP Server API key
Same as the desktop guide — step 1:
- Go to Admin > API Keys.
- Create a new API key with Role set to DHCP Server.
- Copy the key securely for
api_tokeninconfig.toml.
2. Download the Server Core agent zip
Do not install the desktop MSI on Server Core as your primary deliverable.
- Go to Settings > Downloads.
- On the Windows Discovery Agent card, select the DHCP tab.
- Expand System requirements to confirm your host meets the Server Core and DHCP cmdlet requirements (the table describes both MSI and ZIP install paths).
- Under Server Core package (.zip), click Download ZIP.
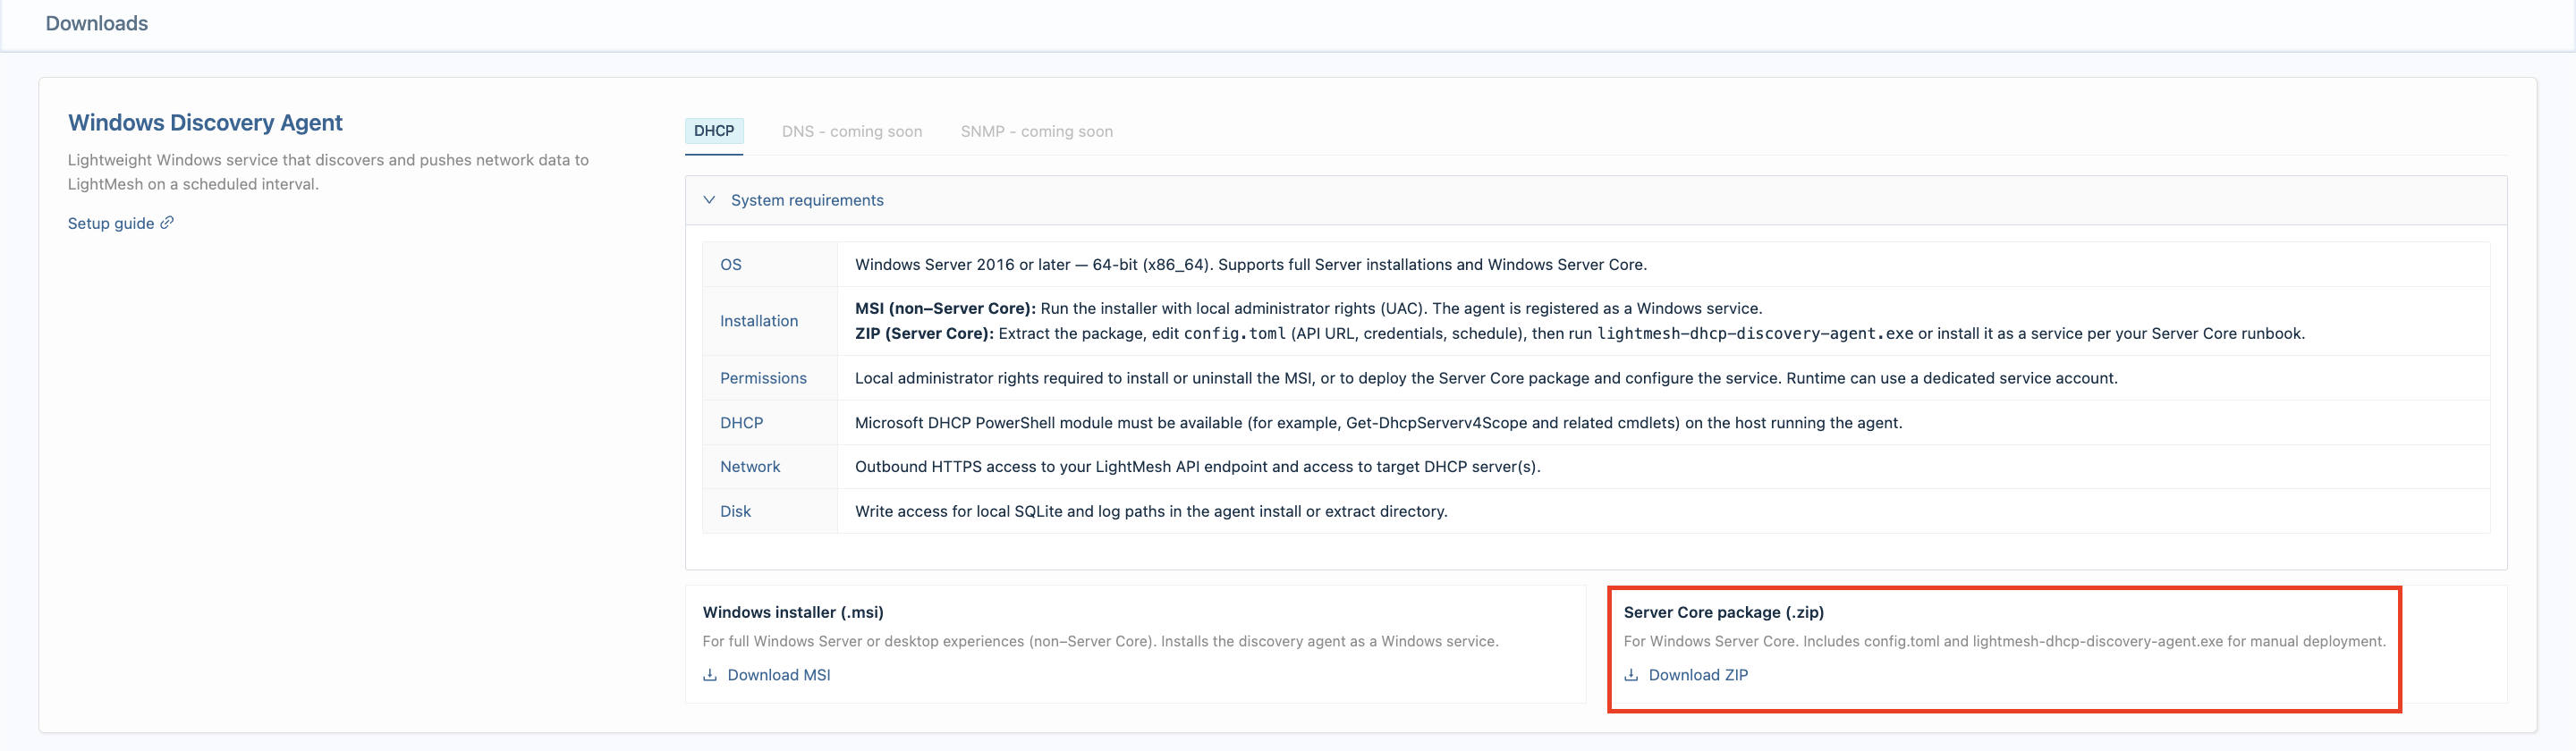
The zip contains lightmesh-discovery-agent.exe and config.toml at the top level (no subfolder). Transfer the zip to your Server Core host and extract both files into your install directory.
Optional direct download (same package as Download ZIP):
https://get.lightmesh.com/lightmesh-discovery-agent-server-core-win-64-latest
3. Installation layout
-
Create an install folder, for example:
C:\Program Files\lightmesh-discovery-agent\ -
Extract both
lightmesh-discovery-agent.exeandconfig.tomlinto that folder. -
From an elevated PowerShell session,
cdto the install directory.
Do not rely on double-click for normal operation on Server Core. A headless build with no arguments runs one collection cycle and exits.
4. Configure config.toml
Edit config.toml in the same directory as the executable (notepad .\config.toml or your configuration management tool).
Set at minimum:
| Section | Keys | Notes |
|---|---|---|
[source] |
server_fqdn |
FQDN of the DHCP server the agent collects from (often this host). |
[lightmesh] |
base_url, api_token |
LightMesh URL and DHCP Server API key from step 1. |
[lightmesh] |
dhcp_server_id |
Leave empty on first install; the agent bootstraps an ID when config.toml is writable. |
[sqlite] |
path |
Writable path for the local database (default example uses ...\bin\agent.db). |
[sqlite] |
queue_batch_size |
Maximum DHCP entities (scopes, leases, reservations, and so on) the agent sends to LightMesh in one sync batch. Use a higher value on busy servers with large lease counts (for example 35000); lower it if API requests time out or hit payload limits. |
Example structure (values are placeholders):
[collector]
agent_version = "0.1.0"
collector_id = "lm-discovery-win-001"
host_name = "dhcp01"
poll_interval_secs = 300

[source]
server_fqdn = "dhcp01.example.local"

[sqlite]
path = "C:\\Program Files\\lightmesh-discovery-agent\\bin\\agent.db"
queue_batch_size = 35000
queue_max_send_attempts = 25
queue_retry_base_secs = 30
queue_retry_max_secs = 3600

[lightmesh]
base_url = "https://next.lightmesh.com"
api_token = "your-dhcp-server-api-key"
dhcp_server_id =

[powershell]
timeout_secs = 30

[logging]
file = "agent.log"
Treat config.toml as sensitive (especially api_token). Restrict file permissions in production; do not commit real tokens to source control.
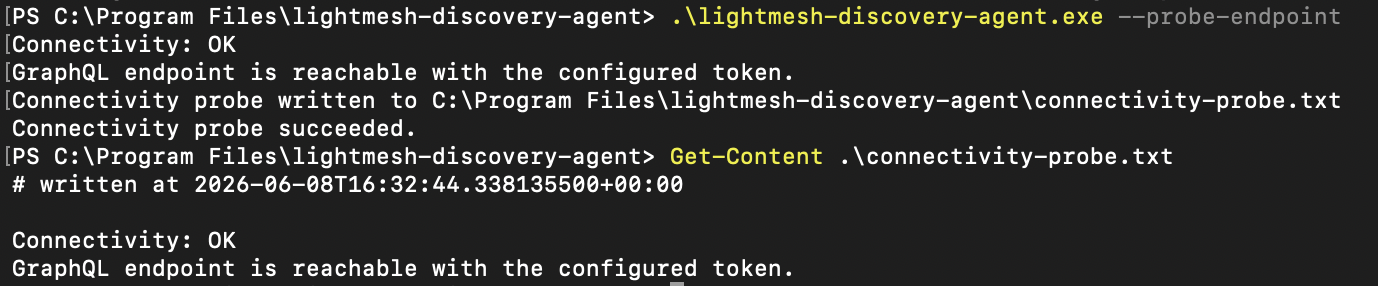
Test LightMesh connectivity
Before registering the Windows service, validate base_url and api_token with the headless connectivity probe (same classification as agent.log sync errors):
.\lightmesh-discovery-agent.exe --probe-endpoint
Get-Content .\connectivity-probe.txt
- Success: prints
Connectivity probe succeeded.and exit code0. The report inconnectivity-probe.txtshowsConnectivity: OK. - Failure: non-zero exit code, a classified summary on the console (DNS, TCP, TLS, proxy, timeout, HTTP 401/403/404/5xx, GraphQL errors), and matching hints in
connectivity-probe.txt. No API tokens are written to the report.
Run --probe-endpoint again after you edit base_url or api_token, or when sync cycles fail with LightMesh API errors in agent.log.
5. Register and start the Windows service
From an Administrator PowerShell session in the install folder:
.\lightmesh-discovery-agent.exe --service-install   # prints: Service Installed
.\lightmesh-discovery-agent.exe --service-start     # prints: Service Started


Each command prints once to the console and writes the same line to operator-cli.txt beside the exe. Failures may also appear in service-error.txt.
Stop or uninstall:
.\lightmesh-discovery-agent.exe --service-stop
.\lightmesh-discovery-agent.exe --service-uninstall


Foreground troubleshooting (logs to console and agent.log):
.\lightmesh-discovery-agent.exe --service-run
One collection cycle without staying resident:
.\lightmesh-discovery-agent.exe --collect-once
After the first successful sync, the agent writes dhcp_server_id = <id> into config.toml when the file is writable. The ID is always stored in SQLite even if Program Files blocks the write.
6. Verify without a GUI
-
Service state
Get-Service *lightmesh*
-
Queue and sync progress (no desktop dashboard or
sqlite3required)cd "C:\Program Files\lightmesh-discovery-agent" .\lightmesh-discovery-agent.exe --queue-status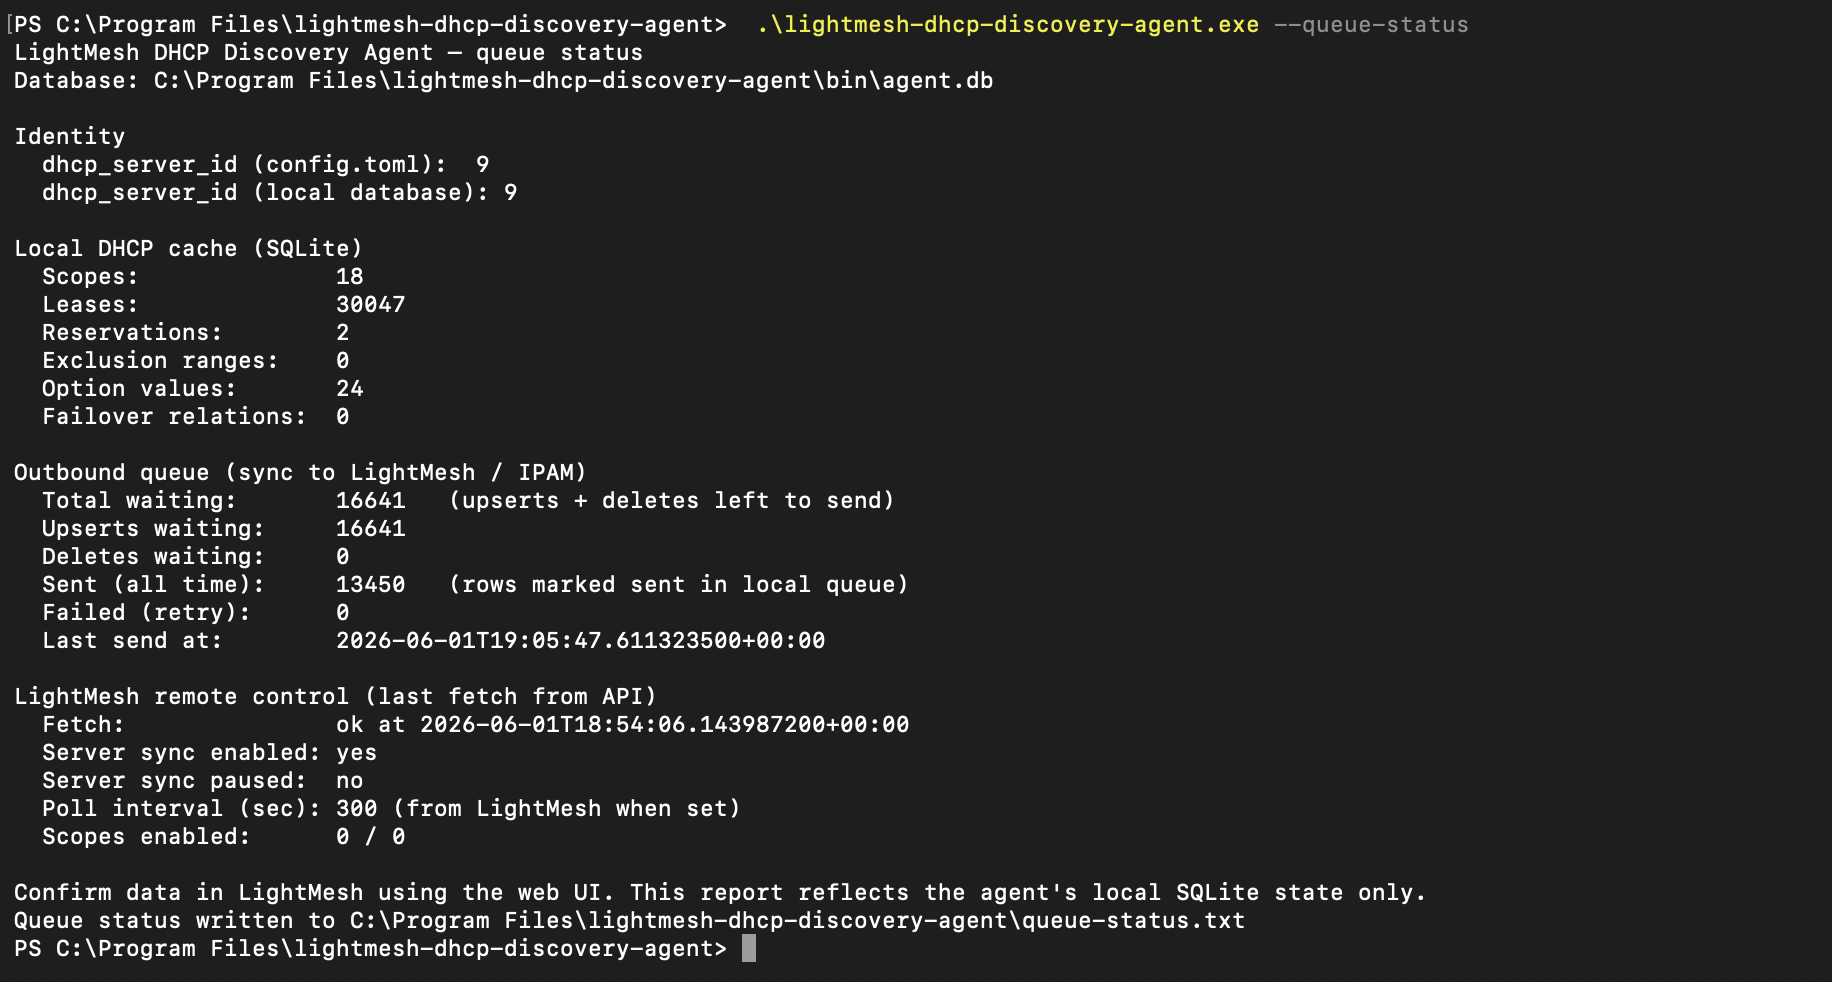
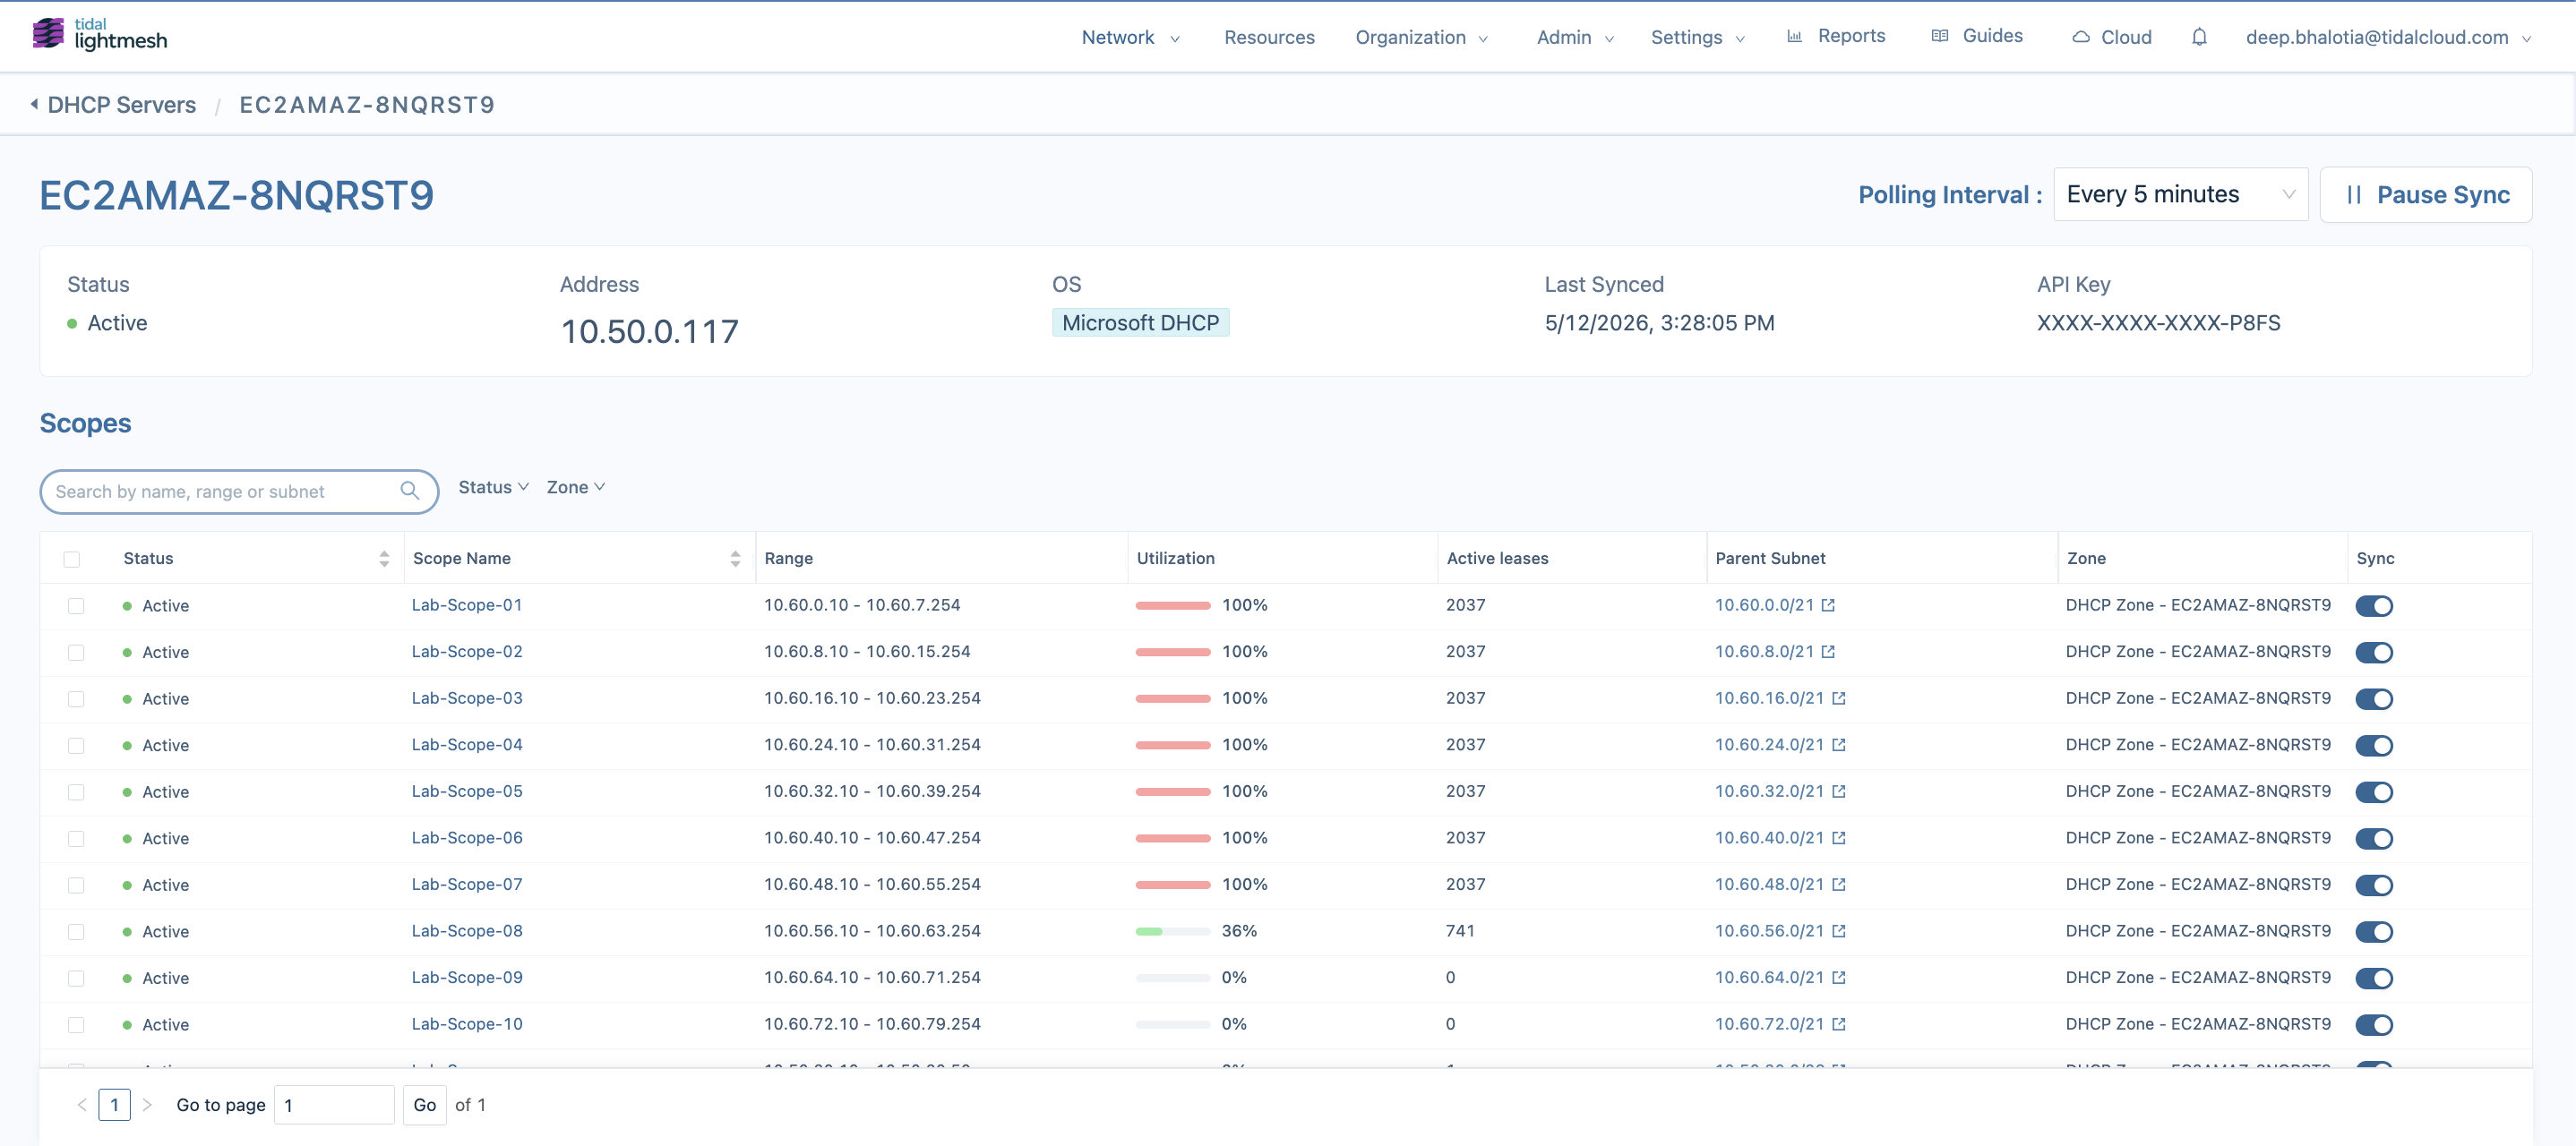
Review Total waiting (queued upserts and deletes), Sent (all time), and LightMesh remote control (pause / poll interval from the API).
-
Connectivity probe (when sync fails or after config changes)
.\lightmesh-discovery-agent.exe --probe-endpoint Get-Content .\connectivity-probe.txt -
Logs
Signal Location Early bootstrap errors startup_error.lognext to the executableService helper errors service-error.txtConnectivity probe report connectivity-probe.txtnext to the executableRuntime tracing agent.log(or path from[logging]in config)Failed sync cycles in
agent.loginclude the same actionable summaries as--probe-endpoint(for example DNS, TCP, TLS, proxy, or HTTP 401/403). -
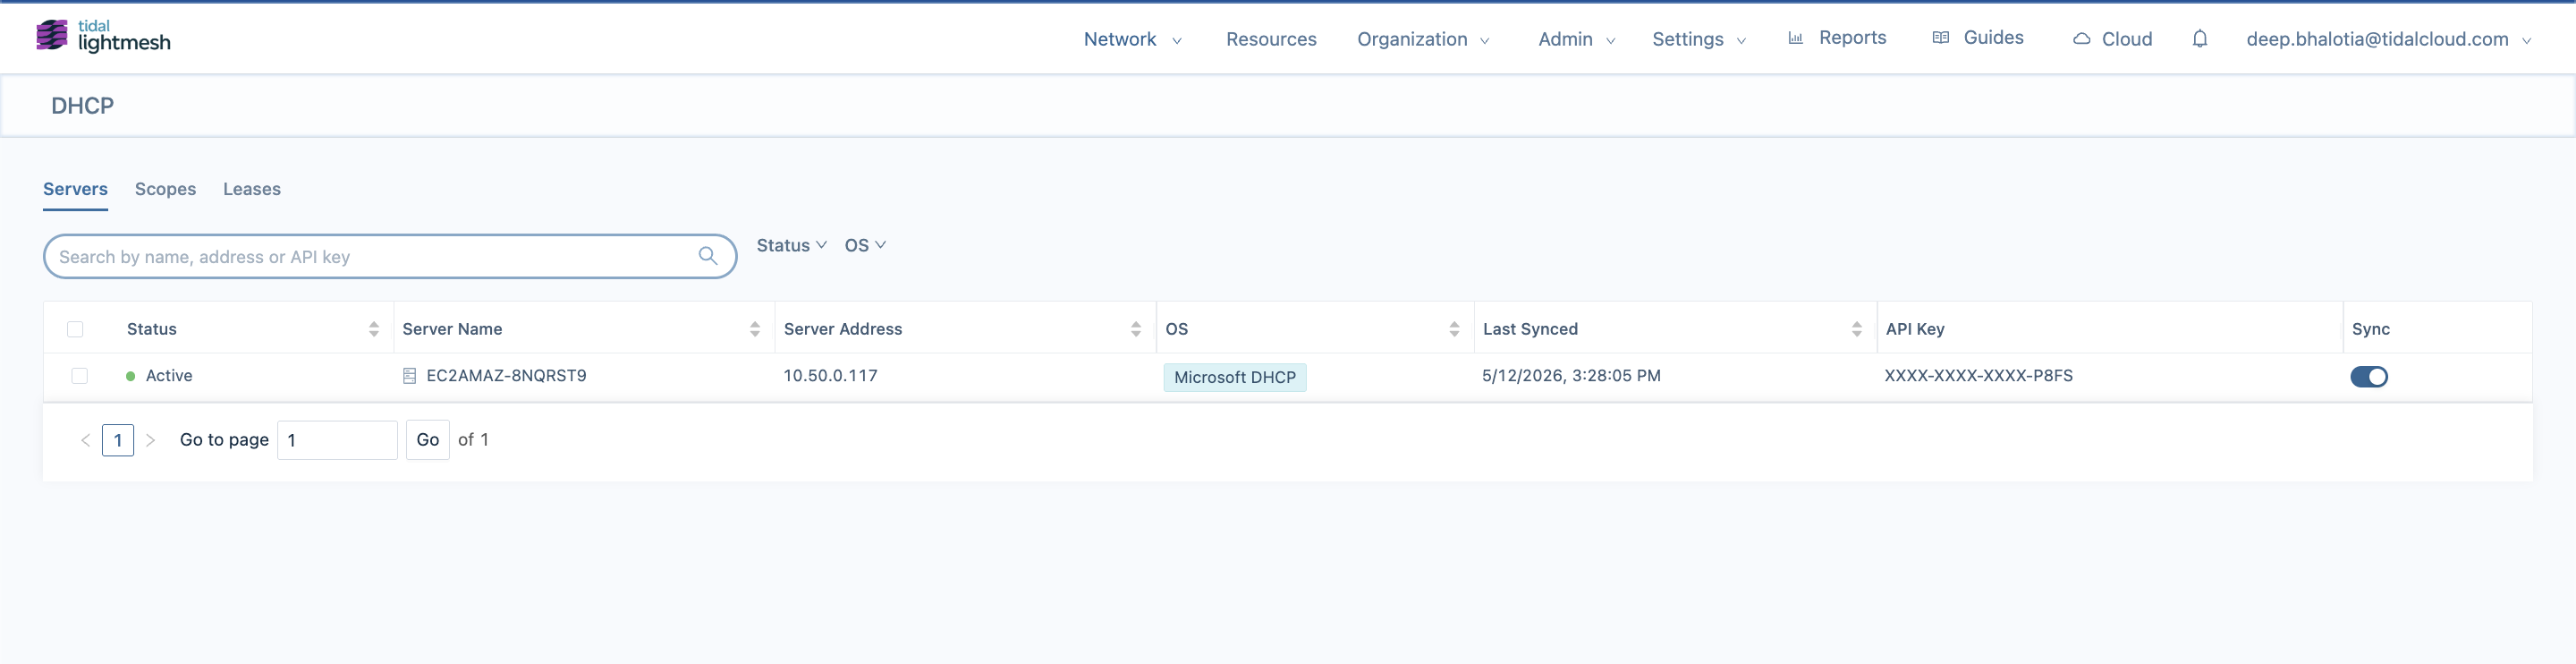
LightMesh UI — confirm servers, scopes, and leases appear under DHCP (same as desktop guide — step 7).
7. DHCP in LightMesh
After sync succeeds, use DHCP → Servers, Scopes, and Leases in LightMesh. Polling Interval, Pause Sync, and Parent Subnet links behave the same as in the desktop DHCP guide.
Upgrade (Server Core)
.\lightmesh-discovery-agent.exe --service-stop- Replace
lightmesh-discovery-agent.exewith the new build from the server-core zip (same headless artifact; not the desktop MSI). - Merge any new keys from the shipped
config.tomlinto your existing file if the template changed. .\lightmesh-discovery-agent.exe --service-start
Operational notes
- Pause Sync / Resume Sync in LightMesh apply on the next agent cycle; use
--queue-statusto see remote pause state locally. - The agent keeps a local SQLite queue. If LightMesh is unavailable, sends retry with exponential backoff up to
queue_max_send_attemptsin config.
Troubleshooting
If DHCP data does not appear in LightMesh:
-
Confirm the Windows service is Running (
Get-Service). -
Run
--probe-endpointand readconnectivity-probe.txtto validatebase_urlandapi_tokenbefore deeper debugging. -
Run
--service-runor--collect-oncefrom the install directory and inspect stderr,startup_error.log, andagent.log. -
Confirm the API key uses the DHCP Server role and has not expired.
-
Verify DHCP cmdlets succeed (see Prerequisites).
-
Confirm
base_urlis reachable from the server (notlocalhostunless LightMesh runs on the same host). From PowerShell on the collector:Resolve-DnsName <host-from-base-url> Test-NetConnection <host-from-base-url> -Port 443 curl.exe -v https://<host-from-base-url>/graphql netsh winhttp show proxy -
Confirm
sqlite.pathand log paths are writable by the service account. -
Use
--queue-statusto see whether entities are stuck in the local queue versus already sent.
If logs or the connectivity probe mention IPv6 and IPv4, IPv6 routing may be broken while IPv4 works. If they mention TLS certificate validation, install your organization’s SSL inspection root into the Windows certificate store. If they mention HTTP 401/403, rotate api_token.
If CLI output appears on the same line as the PowerShell prompt, read operator-cli.txt or upgrade to a build that includes the console CLI fix.
Related guides
- DHCP Discovery (Windows Discovery Agent) — desktop UI, MSI, dashboard, and in-app logs
- Agent repository runbooks (operators): Server Core operator runbook and validation checklist in
lightmesh-discovery-agent(docs/SERVER_CORE_RUNBOOK.md,docs/VALIDATION_SERVER_CORE.md)